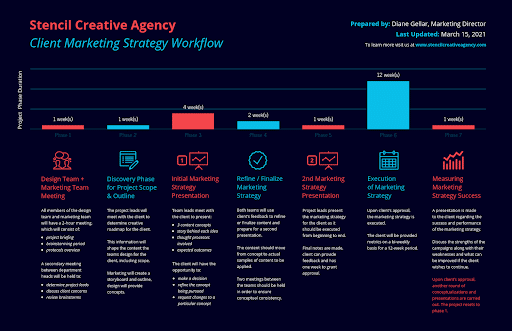
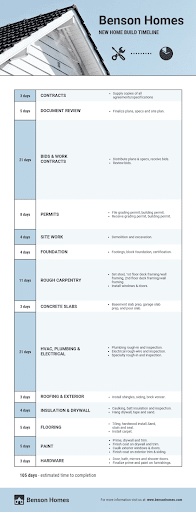
Do you have a major project that has to succeed? Something with a tight deadline that won’t budge? That’s when creating a timeline for your project will make all the difference.
When you create a timeline, you make sense of complex information by organizing it visually according to time. It’s useful whether we’re writing a novel, building a house or trying to save money for a new car. You can even use it when you’re handling multiple projects at work, and you don’t want to disappoint investors and clients.
This step-by-step guide will show you how to create a project timeline.
1: Identify your task.

Luke Southern / Unsplash
The first thing you want to do is identify what your task or project is. It can be anything from mowing the lawn on Saturday, painting a room in your house or building a new deck for your backyard. Whatever it is, write it down.
2: Research your task.
Now that you have identified what you are doing with your timeline, it’s time to find out how long each step will take on average. Different websites offer different information but either way, you’ll need to ask yourself some questions before proceeding with the next steps.
It always helps to start at the beginning. Considering that, begin by writing down the current date on your timeline. This marks the start of your project or presentation.
3: Create milestones.
A milestone is a major point of time that needs to occur during the task. Think about how long each step will take and then create milestones that represent them. These are essentially checkpoints or big changes that will happen along the way, like buying materials or starting construction on a new room in your house.
If you are using a blank timeline template, this should be easy since you just have to enter the data. In case you are new to creating timelines, you can check out Venngage and look for a project timeline example that’s fit for your needs.
4: Fill in important dates.
Once you have created milestones for each section, it’s time to fill in important dates related to this project. Some examples include deadlines for turning in work or upcoming events/projects occurring around the same time as yours. You can use colors or symbols to highlight them.
The next thing you need to do is find out how much time each step will take. Then, create milestones that represent these steps. For example, let’s say that we’re building a deck in our backyard. Cutting the wood to the right dimensions (one milestone) takes one day while putting up the frame (another milestone) takes another.
5: Add tasks to your timeline.

Now that you’ve created milestones and researched your task along with important dates, it’s time to add tasks associated with this project.
Things like picking up wood and supplies need to be done early on in order for all of your other milestones to be met. Creating a visual representation makes it clear which steps need to be done first, second, etc.
6. Assemble your work team and set timelines for each team member.
Then, you need to assemble your work team and figure out how long each person will take to complete their task. You can do this by researching people who might be able to help with your project or asking friends and family members if they would be willing to lend a hand. Once everyone has completed their tasks, make sure you check them against your timeline.
7: Identify how long each task will take.
Now comes the tricky part- figuring out how long each step will take. Although you can ask people who might have experience, there is no one set answer.
Some steps might take more or less time depending on external factors like weather and available materials. The best thing to do is use your research skills and search online for similar projects so you can get a better idea of how much time things should take.
Read Also: Best Courses in Power BI for Beginners
8: Finalize your timeline.

After you have finished each step, it’s time to finalize your timeline. You can add color or symbols to represent different milestones and tasks. In addition, it might be useful to add columns that show when each task is scheduled for completion. That way, you’ll be able to see if everything fits together properly. If not, then you might need to make some adjustments.
Tracking projects can be difficult, especially if there are dozens of tasks and people involved. You can easily get confused or feel overwhelmed with so many things to look after. Fortunately, with a good timeline template, you can actually make the process easier and faster.
For help, you can turn to Venngage. The platform offers beautifully designed templates, high-quality images and font styles you can use to create a really nice project timeline. And the best part? You don’t have to be an experienced designer to use it. Even if you’re new to designing timelines, you won’t have a hard time using it.
Check out Venngage today to find out more!

Hello, My name is Shari & I am a writer for the ‘Outlook AppIns’ blog. I’m a CSIT graduate & I’ve been working in the IT industry for 3 years.