How To Add Reminder In Outlook Email, setting reminders in outlook isn’t easy for new users. Especially if you’ve got to deal with configuring follow up notifications, it can be complicated.
The good news is there are tips and tricks to help you out here.
What is a Reminder in Outlook Email?
You can arrange all of your important emails into one neat, tidy section of your inbox called the VIP email set.
It can help you to smooth prioritize your workflow by letting you simply select certain emails that need the most immediate responses like those from an event coordinator with changes to the agenda or an editor with questions about pitching an article for publication.
The point is, whether you archive those messages or read them right away, remembering to get your work done is important.
You can color important emails using conditional formatting, but if you are in the middle of an important work session and cannot return that time-sensitive email just yet, you can get it done when you have some free time.
In this article, we will explain “How to Add Reminder in Outlook Email?”
- Outlook Not Showing Images
- How To Embed Video In Outlook Email
- Outlook Advanced Search
How To Add Reminder In Outlook Email
When replying to readers’ email, I always prioritize my inbox so that I can answer all questions as quickly as possible. Because sometimes the work gets especially hectic, I set up reminders for those emails I need to get back to.
Please refer to the following screenshot guide on how to set up reminders:
- Firstly Open the Microsoft Outlook Folder then Select the email for that, you like to get the remainder later.
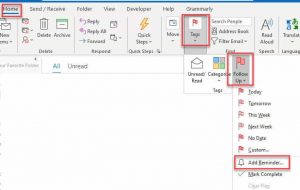
- Now Click on Home Tab then Tags And Follow up to Add Reminder
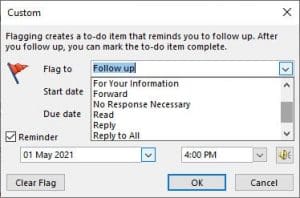
- However In the Custom dialog box, you can select the option, why you want to flag to: Options are as follows:
- Call
- Do Not Forward
- Follow up
- For your information
- Forward
- No response necessary
- Read
- Reply
- Reply to all
- Review
- Here you have to enter the start date and due date (you want to get a reminder)
- Now Select the date and time from the drop-down menu below the Reminder box, select the time you want to receive your reminder for getting Sound Notification, and finally click Ok.
In this case, you can respond to the message by either replying to the email address’ primary email inbox, copying it into another email or replying or following up with both.
The time slot gives you an interval of 30 minutes, and you can choose to either wait until the alert appears or to click in the time field and type your own numbers for it to appear at.
You can also change the sound that an alarm makes, by clicking on the settings icon in the upper right corner of the screen. Click on Sounds and locate a file with a wav extension on your computer. Once you’ve found it, click Open, make sure all the preferences are selected, and then select OK to add it.

You can see a bell icon as well as a flag appearing on both sides of an email message. it’s a handy reminder for following up.
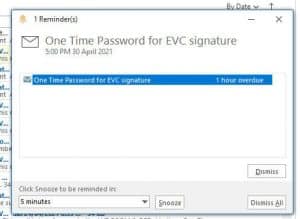
Now once you’ve successfully set up your new appointment, a popup will appear notifying you that it’s time to get back to the project at hand.


Hello, My name is Shari & I am a writer for the ‘Outlook AppIns’ blog. I’m a CSIT graduate & I’ve been working in the IT industry for 3 years.


