How To Assign Tasks In Outlook, set up your calendars. Set up your professional tasks. Your job is to analyze what’s needed to get done, examine the time you have, and get things accomplished.
It’s important to get together with others connected with you on this project – especially if their input will be valuable in achieving desired results for this particular job.
In this article, we will explore and dive deeper into how to assign tasks in Outlook.
How to create and assign a task in Outlook?
There are two different segments of this task.
- How To Turn Off Outlook Notifications
- What Does Sweep Do In Outlook
- We Couldn’t Create The Outlook Data File
- One a user who creates the task.
- And the second the user who receives the assignment/tasks.
Lets get started:
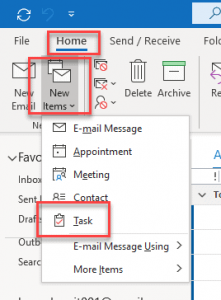
- Firstly open Outlook then Click Home Tab
- Now go to New Items then Select Task
You can easily combine tasks with emails. You can set them up to move emails to Tasks if you use Outlook.
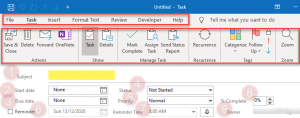
Task New Window is available, which consists of several options like composing New email. You can assign the task to yourself (to-do list), you can also set up a recurrence list, (for such acts which required on the regular basis, monthly, weekly, and so on).
There is a special calendar and to-do list, an automated email address and a lot of other gadgets on your Smart Watch.
- Name your task by entering the subject.
- Select the start date.
- Select the Due date.
- Mention your status.
- Setup the priority
- Check box, in case you need a reminder in task
- Reminder Time.
- Percentage status of the task
- Ownership
- Finally, hit save and close.
In addition, you can click the recurrence button if you would like to be reminded of a certain task every so often.
As a project manager, you can assign tasks to one person (or many people if necessary) and track the progress of those tasks.
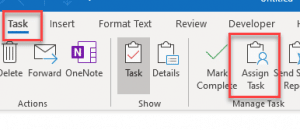
Assign Tasks with ease, From there, simply click on the ‘Task’ tab, then click on ‘Assign Task’ in the list that pops up.
There are several considerations when assigning roles in your team, which can be learned by reviewing the information provided.
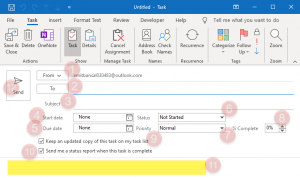
- Select the email address from which you like to assign your task, click “from” and the dropdown list appears.
- Enter the email address of your recipient, the initial letters trigger auto-fill from the contact list.
- Enter the Subject Line or name your task.
- Select the start date.
- Enter the deadline (date).
- Select the status from the dropdown list. (Not started, In progress, Completed, Waiting for someone else, Deferred).
- Can fix the level of Priority.
- Adjust the percentage of work assigned.
- Keep an updated copy of this task on my task list. (by default this option is selected), which is important, Do not change the status.
- Send me a status report when this task is completed.
- Mention the task details (content) in the body of the email message.
- Hit Send.
For example: Outlook 2010 sets the “Reminder Date” by default, which is 2 days before the event date.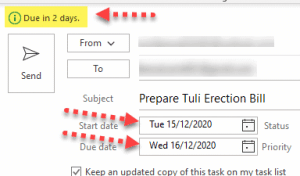
Outlook’s Tasks feature also allows you to save tasks that are stored in a checklist so that you may reference them later AND send them on to your recipient.
(Date of the stored task in your to-do list can be changed directly after it is opened in the separate window).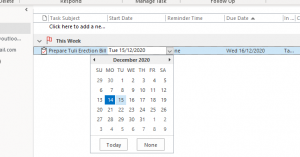

Hello, My name is Shari & I am a writer for the ‘Outlook AppIns’ blog. I’m a CSIT graduate & I’ve been working in the IT industry for 3 years.

