How To Change Outlook View, By default, Outlook’s font page has a nice look to it, but I personally did not want to use much of the space it took up on my screen since I use other programs at the same time.
The positive thing is that you can change its settings or appearance very easily if you are using Outlook in Professional mode for example.
You can modify it according to your needs outside your immediate area of responsibility. In this article, you will learn everything about outlook view.
- How To Pin Outlook To Taskbar Windows 10
- Driver Power State Failure Windows 10
- How to Change Dhcp Lease Time Windows 10
Compact View
By default, the Inbox displays in compact view. Messages are displayed three lines per message:
The first line of the email shows you who the sender is – either their name or their email address. The second line states the subject of the message. Finally, in the third line, you can preview what the body of the email looks like.
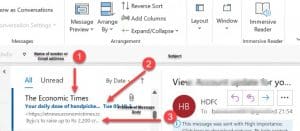
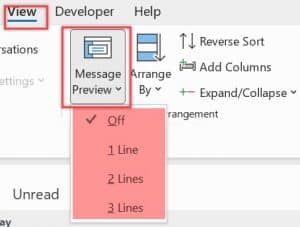
You can expand or collapse the third line using the “Message Preview” section under the arrangement.
Single View
One of the main differences between a single view and a compact view is that you can activate a single view by going to View then Change View to Single.
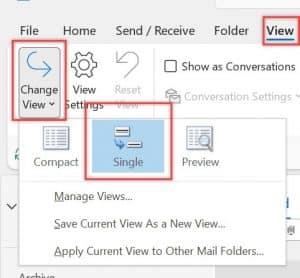
In the single view, the visibility changes entirely, which is filled with settings and options, as well as a message list and reading pane.
When you click on a line in the first column, you will be able to see a preview of the email data including sender’s information, message date and time, attachments(if provided). And the second line shows subject of your email, and body.
You can modify various columns you have added, they will display in the message list.

Preview View
Opening the option of changing preview view by clicking on the drop down menu by clicking View and choosing Change view and selecting Preview.
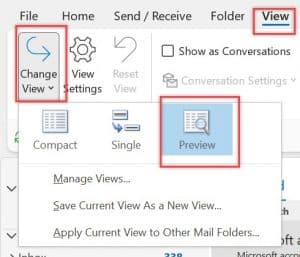
The preview view is like the single view, except for turning off the reading pane. You can simply review the email message in a wider range.

With Preview view enabled, every email contains two lines of text.
The first line shows all of an email’s information in a single column. Every field is represented from those including from, subject, received, size, flag etc. No matter how many columns you have added to this view they will display in the message list.
And the second line indicates the subject and the date received of the email.
Finally, in the last preview, you can see what your message will look like when it’s sent to the receiver.
Customized Current View
Apart from the above feature, you can also customize your own subscription type according to what you need.
How to Add Column In The Current View in Outlook
Compact view doesn’t provide you with information that is readily available in other views. When in Outlook Compact View, click on the Preview, Single or any column view to see additional attributes which are automatically hidden when using this method of viewing correspondence.
Click Mail > Show View Options > Show Mail Folder Pane (next to Mailbox) > Other tabs (at the bottom).

There are two options when it comes to the Show Columns dialog.
- The (Available Columns)
- And the (Shows these columns in this order).
Show these columns in this order consist of distributions associated with products.
In the Available columns list box, please click to select the column you will add.
Use the drop-down list, which allows you to choose from a list of available columns. It is recommended to choose All Mail fields.
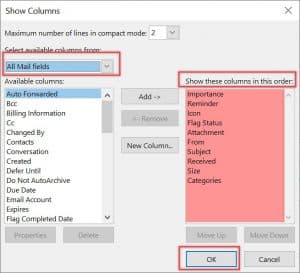
In the Available columns list box, please select the specified column you wish to add.
For Example
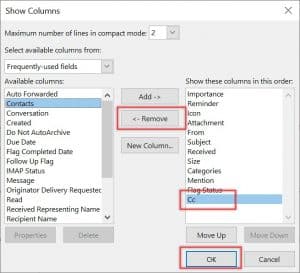
Simply select “Cc” . And then click the “Add” button.
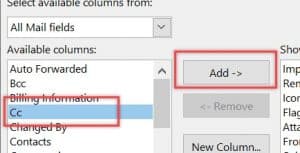
Note: Instead of clicking the “Add” button, you’ll now see an icon that allows the addition of any particular item by simply double-clicking it.
In order to add the right-hand side Cc potion, you have to select it from the options after clicking on the desired clipboard. Then you have to use the move up and down options so as to position the potion correctly for whatever image you’ve copied onto your clipboard.
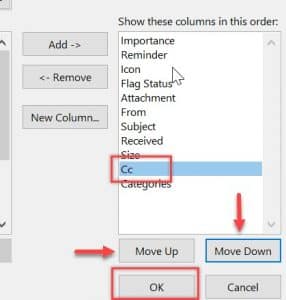
Finally, click the Ok button at the bottom of the pop-up dialog box to confirm that it is actually have saved.
Methods To Remove Column From The Current View in Outlook?
There are a couple of methods to remove columns from the existing folder. First and foremost, we will learn how to remove them with basic commands:
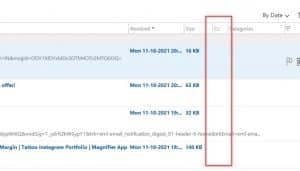
In the compact view, all columns are not visible. In order to view hidden columns in this view you have to switch to single or preview views. To remove the cc column from the compact view, follow these steps:
Click View >> Add Columns to open the Show Columns dialog. On the right-hand side options, you’ve already added Cc so uncheck it and click the Remove button. If you created more than one column, define the width of each column by dragging the borders on each side until they are all roughly same width.
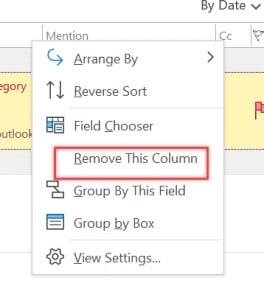
Moreover, you can remove any column from the list by clicking the right-mouse button. In the message list, right click the specified column header and then an option list will appear with Remove This Column among its options.
Remove a column from the current view using the drag and drop method.
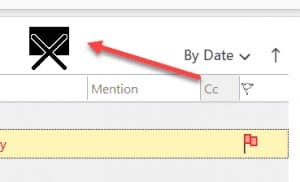
Removing a column from the message list using the drag and drop method is a nice way to go. You can do it all in one smooth move or by a few, simple steps. First of all, click the right mouse button on the specified column heading you want to remove after which you could drag it and drop it, for example, out of your Inbox window into another folder or window.
Then the specified column is removed from the current view immediately.
How To Create Customized Folder View from Scratch?
In each folder, you have the ability to change many different factors from the way a message is viewed with item-specific details or previews to an overall view of your content. You can even use a folder as a way to collect individual messages into a single space where you can then choose how to work with an entire group of items without going through each one individually.
In order to create and modify your own view, click View > Change View > Manage View. In Manage View, you are allowed to manually connect to all the views of the current folder and its associated settings.
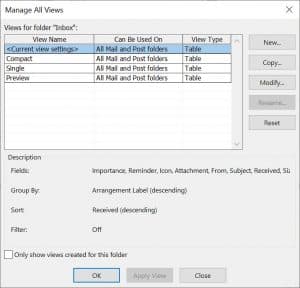
You can create new folder view by creating a custom view of the current folder.
Select the option to create a new view, type a name for it and show you which fields will be displayed by default. Click OK.
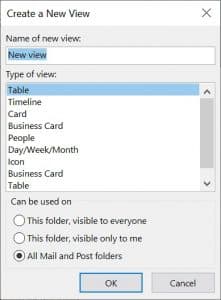
There are multiple product views, “type of view” for instance:
- Table
- Timeline
- Cards
- Business Cards
- People
- Day/Week/Month
- Icon
There are a lot of ways to look at the calendar. In my opinion, one of the best views is by looking at it from a Day/Week/Month perspective. Have a look:
Click the new button on the top left-hand corner of your e-mail program. Select day, week or month to view this message according to your personal preference. Choice one of the available options for storing this message which are often changed in relation to each other and click okay. A new dialog box will appear after choosing a folder and displaying it in “This Folder Visible by Everyone,” “This Folder Visible by Me” or “All Mail and Post Folders,” we suggest you choose according to personal preference. If any changes need making such as altering permissions, click Okay until all dialog boxes disappear from the screen.
Now click on change view from the View tab. With this interface, you can add new views that have been configured to have a variety of different display options.
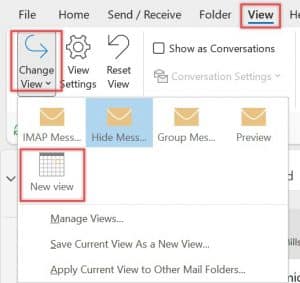
Users enjoy seeing an entire new screen view when they open folders.
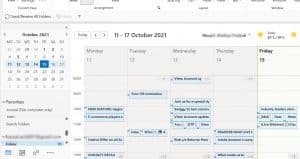
In Outlook, the layout has been entirely changed so that the user can see the available email groups on a specific date at a glance. To open an email in a separate window , you have to double click it.
How To Reset Outlook View?
You can easily change Outlook back to Classic View by going to the View tab on the top of your screen and then clicking on View Settings. Next, click on Reset Current View in the drop-down menu that shows up, and then check out the new view.
In addition to this, Outlook has a lot of cool features. You can set up folders to sort emails the way you need them organized.
This helps you quickly forward emails from one place of work to another for example. There’s also the option of setting up a signature that you can insert into all your outgoing messages so people know where they are coming from and who they’re being sent by, without having a very long signature each time.

Hello, My name is Shari & I am a writer for the ‘Outlook AppIns’ blog. I’m a CSIT graduate & I’ve been working in the IT industry for 3 years.
