
Outlook Send/Receive Settings, Outlook uses a default setting for when and under what conditions it checks for new email and then sends your outgoing mail.
Sometimes you might want to schedule when automatic messages are sent out. Here, we will give some step-by-step methods about “How to schedule how often auto send/receive occurs”.
You can manage your data feed to check for updates every few minutes or every few hours.
- Where To Find QR Code In Microsoft Outlook
- Asus Laptop Keyboard Not Working Windows 10
- How Outlook Search Attachment Name File
How to change send/receive settings in Outlook?
You are expecting an important email. You didn’t know there were tools available to make the waiting more enjoyable, but what you do know is that after writing your message you can chose “schedule new messages automatically” following these steps:
- Firstly Open the Outlook
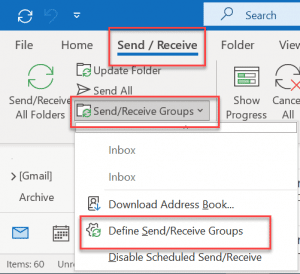
- And then Select Send/Receive >> Send/Receive Groups >> Define Send/Receive Groups, (or you can also use keyboard shortcut: Ctrl +Alt +S)

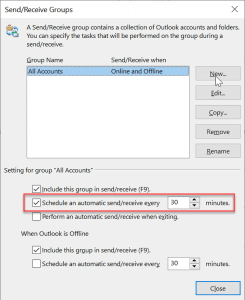
- Then the Send/Receive Groups dialog box appears, and highlight All Accounts.

- Now Select the Schedule and automatically send/receive every check box.
- However, By default 30 min is designed, you can modify the interval manually (maximum up to 1440 minutes & Minimum to 1 minute).
- And then you have to Select Close.
How to Include & Exclude Account in the group for Outlook Mail Checking?
Outlook is a commonly-used email client. Most email users have multiple accounts with it, which makes it particularly useful for group mail checking.
- When in the Send/Receive Groups dialog box, highlight All Accounts.
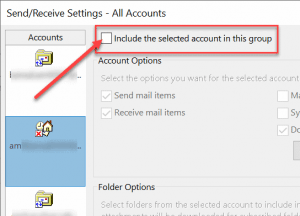
- The Click on Edit, Send/Receive setting Dialog box appears.
- Now On the left hand pane section, all your email account is added, you can also observe the red cross sign on the email address icon, which indicates that the email address is not Include the selected account in this group.
- In order to add an account to automatic checking, choose the account and select the Include the selected account in this group checkbox.

- Finally you can click Ok and Close the dialog box.
Outlook Send/Receive Settings in Outlook 2003
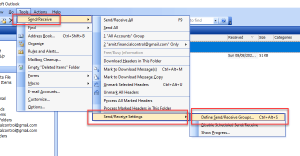
- Here firstly Open the Outlook 2003 then Click on Tool and then send/receive.
- After that go to Send/Receive Setting and Define send/receive Groups (Or use Ctrl + Alt + S shortcut key).

- And finally Send/Receive Groups dialog box appears, you can also follow the similar steps above.

Hello, My name is Shari & I am a writer for the ‘Outlook AppIns’ blog. I’m a CSIT graduate & I’ve been working in the IT industry for 3 years.