Welcome to the how to disable windows defender guide for windows 10 prepared by Outlook AppIns. In this article, you will discover guaranteed solutions to turn off the Windows firewall temporarily as well as permanently. These techniques work for any version including home and pro edition using methods like gpedit, command prompt, and registry editor.
During the troubleshooting, we will make use of default system settings or registry items to get the job done. Also, it can help install blocked software and programs into your computer. Plus, an antivirus developed by a third party company of your choice can also be activated.
Windows Defender is like any other antivirus software. It can protect your PC from viruses, hacking attacks, and other malicious activities. Thus, disabling the default firewall will also leave your computer vulnerable. Your laptop might receive threats and attacks if you are connect or work on the internet 24/7. Therefore, when you disable windows defender, do it at your own risk and caution.
Besides, there are less risks if you have a trusted antivirus software running. But if not, then your computer might be in trouble. So have a premium and reputation filled antivirus activate on your system as an alternative protection.
How to disable windows defender windows 10
Alright, let’s get started with all the working, tried and tested steps to turn off windows defender.
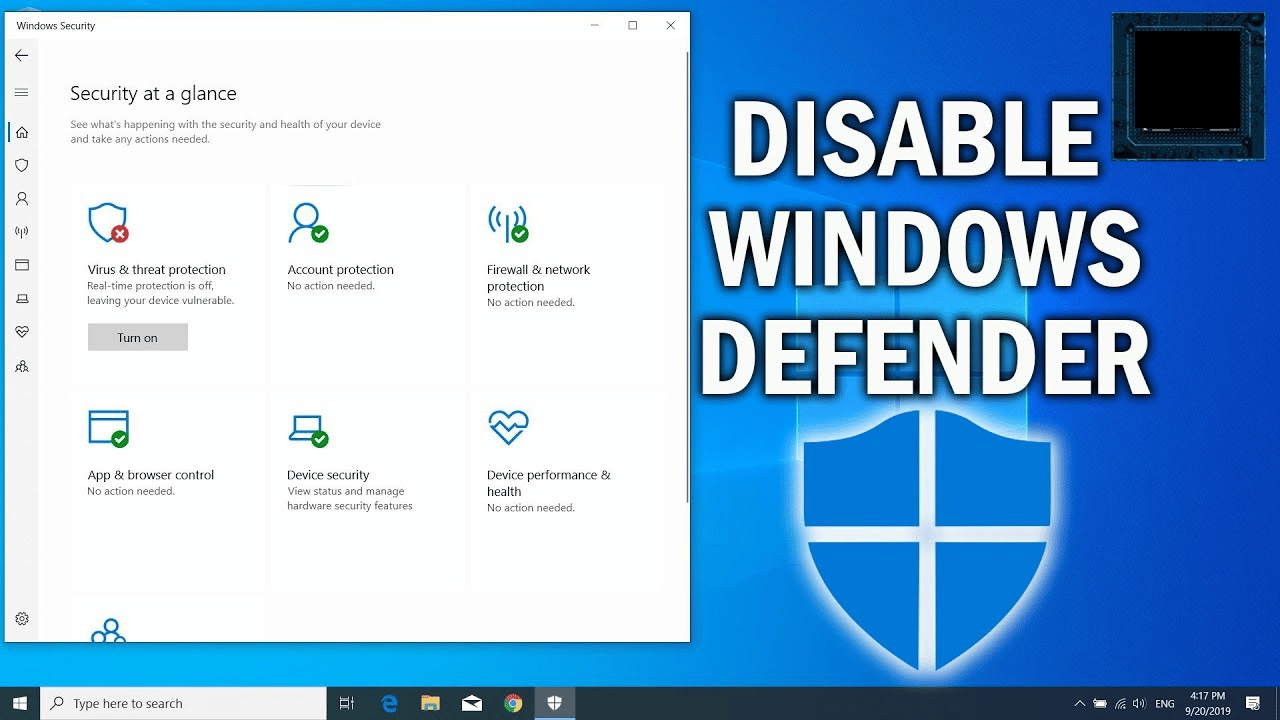
Turn off real time protection
- First, of all, open the ‘Start’ menu by clicking on the bottom left corner or by pressing the ‘Windows’ key.
- Select ‘Settings.’
- Click on ‘Update & Security’.
- Choose ‘Windows Defender’ from the list of different options on the left sidebar.
- Pick ‘Open Windows Defender Security Center.’
- Navigate to the ‘Virus & Threat Protection’ button.
- Open ‘Virus & Threat Protection Settings’.
- Turn off options like ‘Real-Time Protection,’ ‘Cloud-Delivered Protection,’ ‘Automatic Sample Submission’ and ‘Controlled Folder Access.’
If you have the latest updated version of Windows 10 installed, the windows control center will ask for permissions while trying to turn off real-time protection. Choose ‘Yes’ to grant permissions to windows defender if it prompts.
Disable Windows Defender Group Policy
- First of all, open ‘Run.’ You can do that by pressing hotkeys ‘Windows + R’ or by searching ‘run’ on the Cortana search box.
- Type ‘gpedit.msc’ and press enter.
Alternatively, you can type ‘Edit Group Policy’ in the Cortana search box to open the local group policy editor. It is just the same thing. Take a look. - From the list of different options on the left sidebar in ‘Local Group Policy Editor,’ navigate to Computer Configuration > Administrative Templates > Windows Components.
- Scroll down and select “Windows Defender Antivirus.” Then double click on “Turn off windows defender antivirus.”
- Select ‘Disabled.’
- Then ‘Apply’ and finally ‘OK.’
In this way, you can turn off windows defender in windows 10 using Local Group Policy Editor. If you want to turn it back on in the future, follow the same procedure up to step 4. In step 5, switch from disabled to either ‘Not Configured’ or ‘Enabled.’ This will turn the firewall back on.
3. Terminate Registry
Note: This method needs restarting of the computer at the end. So be prepared by saving all your necessary data and files before getting started. Also, close any software or window that you are previously running. This will protect your work. With that said, below are the steps to disable windows defender using Registry Editor.
- Open up Registry Editor by searching ‘regedit’ on the Cortana search box in the start menu.
- User Account Control will ask for permission when you try to open the Registry Editor. Grant permissions by selecting yes.
- Navigate to HKEY_LOCAL_MACHINE > SOFTWARE >Policies > Microsoft > Windows Defender.
- Right-click the Windows Defender folder.
- Hover over to ‘New’ and select ‘DWORD (32-bit value)’. Take help from the screenshot below.
- Rename the registry item to ‘DisableAntiSpyware.’
- Double click on registry item ‘DisableAntiSpyware’ after renaming it.
- Change the value data to 1 and select OK.
- Finally, restart your computer.
Queries
Final verdict
I hope this article helped you to learn how to disable windows defender in windows 10. Were you able to turn off the windows firewall? Also, do you prefer using Windows Defender Antivirus or custom 3rd-party antivirus software for your computer? Tell us quickly in the comments below.

Hello, My name is Shari & I am a writer for the ‘Outlook AppIns’ blog. I’m a CSIT graduate & I’ve been working in the IT industry for 3 years.