Windows 10 microphone too quiet, the first solution to the problem discussed over is to try Windows 10’s built-in troubleshooter feature.
If you are on any VoIP software, or even dealing with VoIP via Skype when speaking to your office mates or friends, for example.
And wish for louder volume in order to sound less whispery or soft-spoken a lower mic volume might be of irritation to the user on the receiving end.
Windows 10 microphone too quiet
For me, the Creative Headset HS 330 had mic quality issues. I really didn’t like it as a headset. It had very low sound even after all adjustments.
And secondly, it was not compatible with Windows 10. It was working fine with other versions of Windows.
The following is the check list of solutions if your Windows 10 microphone is too quiet in volume and not audible
- Install the latest drivers of your “branded” mic headset.
- Uninstall and Reset Skype kind of IM and voice calling software.
- Select the “correct” microphone as “default” mic device.
- Try the Microsoft “default” drivers first.
- Use a different “brand” mic headset, if it doesn’t work in Windows 10.
- Check for “loose” connections, if it’s a wired mic headphone.
- Uninstall the audio drivers and reinstall them.
When the other mic was too quiet, I made several configuration changes. But the Creative headset refused to buckle.
As a last resort I ordered a new “Quantum Stereo Headphone with Mic for PC Laptop Desktop – QHM 316” which was very cheap and worked perfectly.
It had both headphones and a microphone, so it did everything I needed in one package. 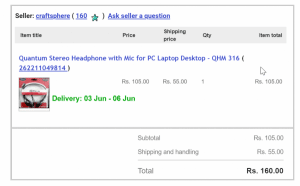
When you’re buying a headset with a mic, make sure that the headset is compatible with Windows 10. Otherwise, it might not produce any sound when recording videos or participating in a Skype call.
How to Troubleshoot Windows 10 Mic Volume is Too low
Troubleshooting issues on a computer has now changed for the better. Instead of going through a cumbersome Control Panel, you can now do it simply and quickly from the Windows 10 Action Center with just a few clicks.
Follow these steps:
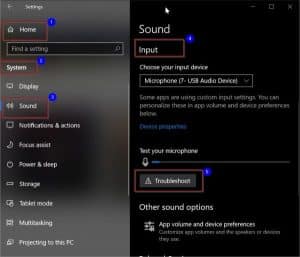
- Press Start button and the gear icon.
- Windows Settings will open.
- Double-click on System.
- Select “Sound” on the next pop-up window.
- On the right-hand side, scroll through to get “Input”.
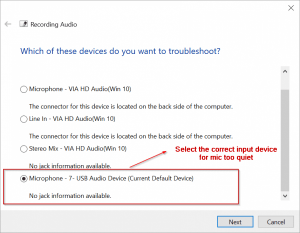
- Choose the right input device – (here the mic you are using. If you have different microphones than they are listed. So make sure to select the mic through which you want record voice).
- Check if the mic volume to quiet is solved.
- Otherwise, there is a “Troubleshoot” button below.
- Click it. This should open another window.
- Follow the next few screens, to troubleshoot your mic issue.


This should be the first step when everything is set up correctly. However, what happens if your settings are incorrect?
If this is the case then you need to make corrections in the microphone properties and choose a better sounding setting so that you can produce bigger sound.
How to Increase Mic Volume Level in Windows 10?
This is a generic way of increasing the volume of your microphone without favoring one system or device over another. You can do this on a Windows PC by finding the Properties control panel and opening it up under Volume.
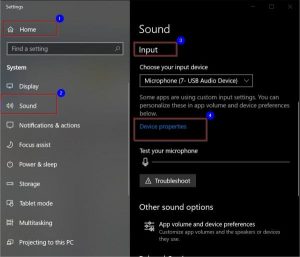
- Go to Windows Settings.
- System > Sound > Input.
- Select the Input device – Microphone (7-USB Audio Device) (for eg. In my case)
- Click on “Device Properties”.
- This will open “Microphone Properties” pop-up window.
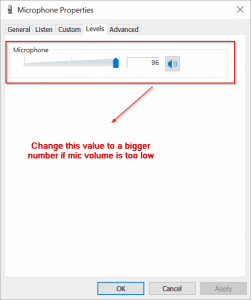
- Click on the “Levels” tab.
- Increase Microphone volume level, which is between 0 and 100.
- It depends on the brand of the mic, on what value to be set.
- Some mics require value of less than 50, while some require near 100.

This is a typical way to raise an audio recording to just the right level and be heard without straining one’s voice.
You can also bring up the “Speaker Setup window”, by right-clicking on the speaker icon in your system tray.
Clicking it will cause the pop-up to open directly and take you directly into speaker settings, which are located within “Windows Settings”.
You can also configure a microphone through the Control Panel. Click on your computer’s start menu and type “Control Panel”, then select “Control Panel” on view by small icons mode.
Go to Sound, then select Recording tab and in the list find your working “Microphone”. Select Properties below to open Microphone Properties pop-up window and there you can easily adjust its settings. 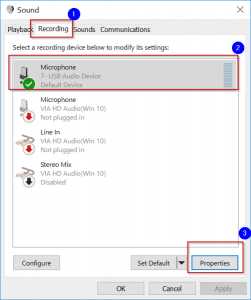
The rest of the process for increasing the volume of your mic is the same.
Find the Right Sound Drivers in Windows 10 for your Headset with Mic brand
This is one of the tricks to get your microphone working normally again with more optimal volume.
If you’re using a Realtek, Plantronics or Razer Kraken microphone and the audio output is very quiet, you’ll need to install their right kind of drivers before getting it set up properly.
Generally speaking, if you’re using Windows 10, Microsoft will install their default drivers.
But what happens may often times be that they don’t have a proper driver installed so this can cause issues with the sound quality and overall performance.
As we discussed earlier, audio drivers can have issues. If this happens, uninstalling and then reinstalling them should fix things. 
Skype Problems for Windows 10 Microphone Too Quiet
In the PC, you can download and install Skype for Windows 10. Then you can use your headset to make free calls to other countries.
Sometimes, there are issues with Skype settings or software that affect others when they hear your voice through the headset. In this case, try some of these solutions.
- Re-install Skype once again. You can delete the existing Skype app and install again in Windows 10. This can be done by going to “Programs and Features” in Control Panel. Otherwise, you can make use of the “Windows Settings” feature. You can select “Apps” > Apps &features. On the right-hand side find your Skype app, uninstall and re-install again.
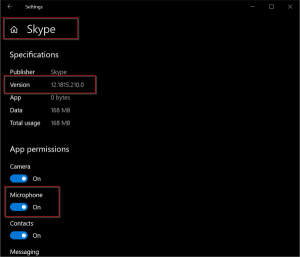
- Check your app permissions for Skype app. It should allow access to your “Mic”. This can be done by clicking the “More” option under the Skype app in “Apps & Features” section.
- Upgrade to the latest version of Skype. The current version I am using is 12.1815.210.0.
- Rest the Skype app. If you do this, your Skype app will be reinstalled in Windows 10 and revert back to its default settings, which is important. But your stored messages or documents will not be affected.

Another important thing you need to remember is to make sure that your devices are configured correctly.
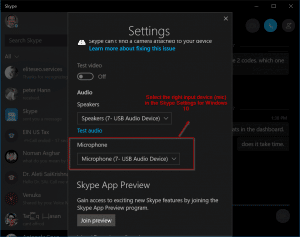
Open up Skype and click the three dots at the top (to open the menu bar).
Select Settings. Under Microphone, select your mic – Microphone (7-USB Audio Device) (for example). Make it the default input device.

Hello, My name is Shari & I am a writer for the ‘Outlook AppIns’ blog. I’m a CSIT graduate & I’ve been working in the IT industry for 3 years.