
Do you have a grainy JPEG image that you need to improve? Grain is a visual distortion in your pictures and is mainly indicated as spots of splotches of discoloration present in your photograph. If you are annoyed by your grainy images, don’t worry, we will help you to know how to fix grainy JPEG images.
There are several reasons why your images may get blurred. This article explains various reasons for your grainy photos and common methods that you can apply to solve them. This article also features some tips that you can apply to avoid the graininess of your picture. So, go through the methods mentioned in this article to turn your photos into their original look.
Why Do Photos Get Grainy?
Before you learn how to repair grainy photos, it is important to find the exact reason why your digital photos may appear grainy. Some main reasons that may generate grainy images are:
- Inadequate ISO Setting: One of the main reasons for grainy pictures is the high ISO setting on your device. ISO indicates the sensitivity of the camera’s image sensor to light. This as result, increases the visibility of noise or grain in the image.
- Image Compression: When you save an image in any file format, it utilizes compression to reduce file size. This compression somehow discards some image data and leads to the loss of image artifacts, including graininess. Higher levels of compression can produce high graininess in the image.
- Image Editing: Some image editing techniques, like an increase in exposure, shadows, or contrast, can generate noise in your photos. Aggressive editing or applying excessive sharpening can also contribute to the graininess of your image.
- High Zoom levels or Digital Zoom: Using high zoom levels can cause noise in your images. This crops your image and enlarges a position, which can increase the graininess in your digital photos.
How do I Fix Grainy JPEG Images?
Now that you are familiar with the reasons for your grainy photos, it’s time to avoid such issues and acquire clear and sharp images. There are several methods that you can apply to minimize graininess in your pictures. Some of them are:
Method 01: Use Low ISO
Using higher ISO settings in a digital camera can manipulate the amount of light entering the lens and thus distorts the image. To avoid such a situation, you need to keep the ISO of your image as close to 100, if possible. However, when you need a higher ISO, try changing the aperture first and this changes the shutter speed (maximum 1/60 without a tripod/wall), as this will help in lowering ISO.
Method 02: Fix Grainy JPEG Images Using Photoshop
Many users found that using Photoshop is one of the simplest methods to fix graininess in their photographs. You need to follow the below-given steps to know how to repair grainy photos using Photoshop:
- Launch Photoshop software on your device and open the image that you need to repair.
- Go to Filter > Noise > Reduce Noise. Now, you will get a Reduce Noise pop-up window with various options: Strength, Sharpen Details, and Preserve Details, on your screen.
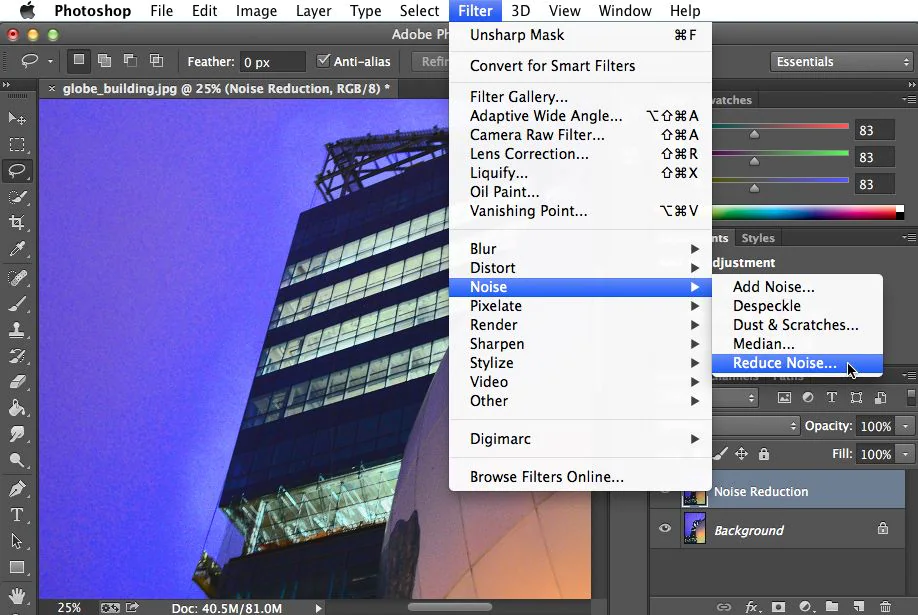
- Adjust these settings until you find the image is fixed.
- You can also click on the ‘Remove JPEG Artifact’ box to check the outcome as per the changes.
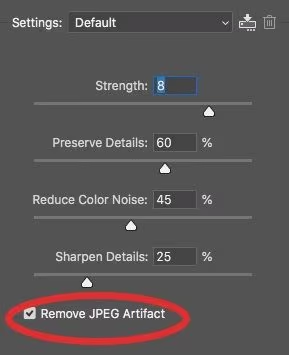
Once you are done with the above changes, click the OK button to save the edited image.
Method 03: Use Adobe Lightroom to Reduce Noise
Lightroom is also a useful software application that you can use to reduce the graininess of your image. Here are the simple steps that you need to follow to fix grainy JPEG images using Lightroom:
- Firstly, open the Lightroom app on your system and open the photo you need to repair.
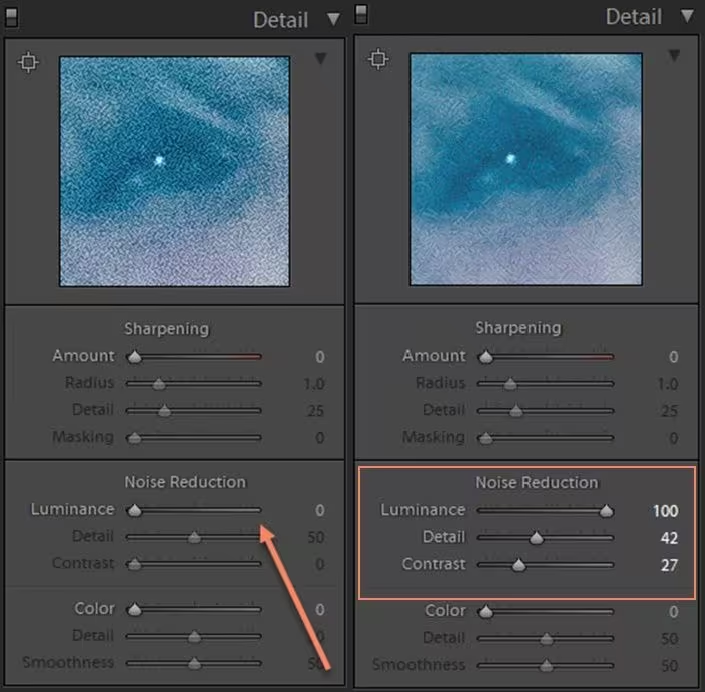
- Select the ‘Detail’ option in the right navigation pane.
- Now, you will get Luminarc and Color options under the Noise Reduction tab.
- Adjust the noise reduction bars using the ‘Detail’ and the ‘Contrast’ option.
After making the desired changes, make sure you save the edited photos at any safe location.
Method 04: Use Photo Repair Tool to Fix Grainy JPEG Images
If the above methods fail to repair jpeg file, you can use a professional image repair tool, such as Stellar Repair for Photo. This software serves as the best tool for repairing corrupted or damaged photographs. Not only JPEG file formats, but you can also use this tool to repair other RAW photo file formats. It is all-in-one software to repair damaged, pixelated, distorted, disoriented, greyed-out, and corrupt images.
- The Stellar Repair for Photo tool supports the repairing of multiple images simultaneously.
- It can repair your grainy images saved in any storage device, including Windows & Mac HDDs, SSDs, USB flash drives, memory sticks, SD cards, and other storage media.
- You can repair photos shot from DSLRs, CCTVs, camcorders, and other devices.
Now check the step-to-step instructions to learn how to repair grainy photos using the Stellar Repair for Photo tool:
- Download and install the Stellar Repair for Photo tool in your system. Launch the software and click Add File button to select the photo you need to repair.

- After adding the corrupted files, click the Repair button to start the repair process.
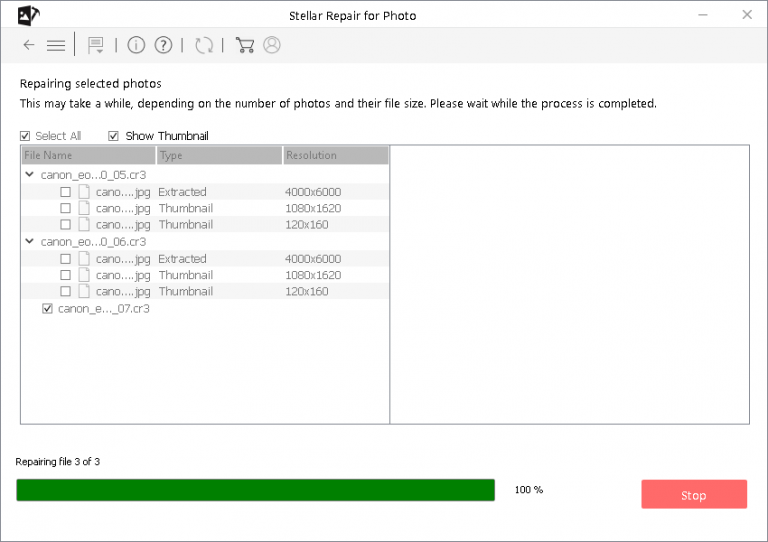
- Once the repairing process gets completed, preview the repaired JPEG photos and click the Save Repaired Files button.
How to Prevent JPEG Photos from Getting Grainy?
Though the methods to fix JPEG images are quite easy to implement, but it is important to learn some methods to avoid such issues. Given below are some important tips that you can keep in your mind to avoid your photos from getting grainy:
- Make sure your computer is not infected with viruses or any malicious programs.
- Avoid taking pictures in low resolution as doing so can make your photo look grainy.
- Use low ISO settings on your camera to reduce image graininess.
Wrapping Up:
Hope, the above methods help you to know how to fix grainy JPEG Images. These methods will help you to restore your original pictures by removing graininess and other noise from them. Photo editing tools, such as Photoshop and Lightroom are the best ways to reduce grain in your photos. But if they fail, you can use a professional image repair tool, such as Stellar Repair for Photo to repair any digital photo.