How to Change Mac Address in Windows 10, The MAC address is one of the very crucial component of every network device these days, and in some cases you might even need to change your MAC address.
This is a relatively simple type of procedure, and today in this article we’re going to show you that how you can change your MAC address on Windows 10 with the help of MAC address changer.
The MAC address is actually a unique identifier which allows your network device, such as a Ethernet or the wireless card to connect with other networks.
Every single one of the network device comes with a Media Access Control, or MAC for instance, address which allows that device to be identified on the network.
Just like the IP address, the MAC address is crucial whenever transferring data from one computer to the other, because each of the data packet comes up with a header which contains the MAC address of the destination PC.
Unlike the IP address which is assigned to your PC by your ISP or the network administrator, the MAC address is assigned by the manufacturer of your network device.
Related Article: How Many Passes in Defrag Windows 10
Change the MAC address on Windows 10 with the help of MAC address changer
- Change your MAC address With Device Manager
- Or use third-party tools to change the MAC address
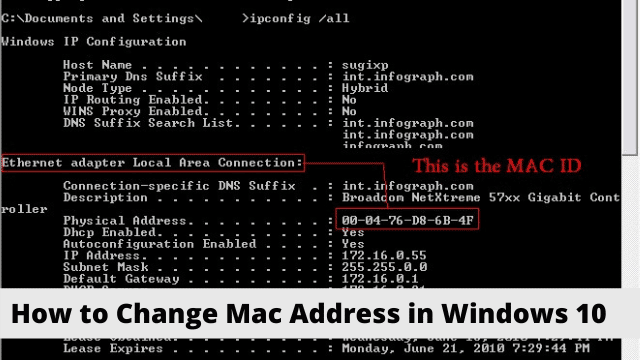
In order to change the MAC address, firstly you need to know that how to locate it.
Total unlike of the IP address, the MAC address isn’t displayed inside the network information window, but it’s still quite easy to find by the following steps:
- Press the Windows Key + X and then select Command Prompt from the menu.

- Once when the Command Prompt opens up, enter the get mac /v /fo list and then press Enter to run it.

- Then the List of all network adapters should appear. Here now Locate your network adapter and check the Physical Address so you can see the adapter’s MAC address. As you can see now, the MAC address is represented by hexadecimal value and it consists of 6 pairs of characters.

Once when you know how to locate and check your MAC address, Now let’s see how you can change it. Well Changing your MAC address doesn’t require any third party tools, but you can use it if you prefer to do it that way.
Well before going any further where we show you that how can you easily change your MAC address,
keep in mind that changing the MAC address might cause issues with the current network you are using.
In even a worst case scenario, your network device might not even be able to recognized by the network.
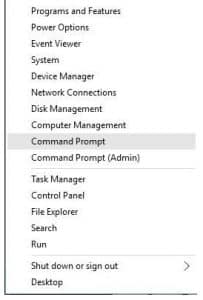
Method – 1 Change the MAC address with Device Manager
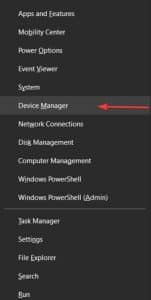
- Press the Windows Key + X and select the Device Manager from the given list.

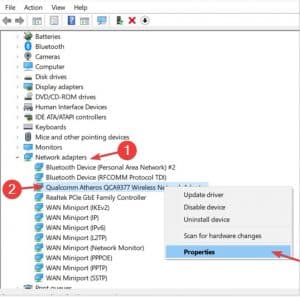
- Once when the Device Manager opens up, here locate your network adapter, and right click it and select Properties.

- Once when the Properties window opens up, now navigate to the Advanced tab and select the Network Address from the list of the Properties.
- Select the Value option and then enter any 12-character hexadecimal value.

- Now Click OK to save the changes.
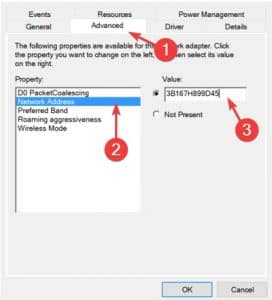
Here As you can see now, that changing the MAC address is very simple, but keep in mind that the actual physical MAC address remains the same all the time. In case if anything ever goes wrong you can simply revert it by following the aforementioned steps given.
Just choose Not Present in Step 4, and you’ll easily revert back to the default MAC address.
Method – 2 Use the third-party tools to change the MAC address
In case if you want to use a MAC address changer to change your MAC address on the Windows 10, there are few tools which you can use.
One of them is the Technitium MAC Address Changer. In order to use this tool to change the MAC address, follow the steps given below:
- Firstly Download Technitium MAC Address Changer Once when you’ve downloaded and installed this tool, simply run it.
- Whenever Technitium MAC Address Changer starts, you will be able to see the list of all network adapters which are available.
- Then Select the network adapter which you want to change and in the Change MAC address section enter the new MAC address. Keep in mind to use a hexadecimal value. If you wish to make this step any faster, you can just click Random MAC Address button which will generate you a random MAC address.
- Now Click the Change Now! button and then your MAC address should be changed.
- This is Optional: In case if you wish to restore your default MAC address you have to just click the Restore Original
Another tool which you can use is the SMAC MAC Address Changer.
This tool also works the same as to the previous one, but it comes as an evaluation copy, so it lacks certain features such as the ability to change the MAC address of the multiple adapters.
Another one of the MAC address changer tool which we have to mention is the No Virus Thanks MAC Address Changer. This is a completely free and yet a simple tool which allows you to easily change your MAC address.
In order for you to do that, you have to start the application, and then select your network adapter and simply click the Change MAC button.
After that you can manually or randomly enter the new MAC address. Yes Of course, there’s also an option for you to restore your MAC address as well.
Conclusion
In this article we have discussed about that How to Change MAC Address in Windows 10 for everyone to understand it easily we have explained it in steps and also we have explained two of the different methods to get it done.

Hello, My name is Shari & I am a writer for the ‘Outlook AppIns’ blog. I’m a CSIT graduate & I’ve been working in the IT industry for 3 years.