All we need to do is press Windows key + shift-S (or click the new Screen snip button in the Action centre)to capture a screenshot. Your screen will dim and you’ll see Snip ‘n Sketch’s small menu at the top right corner with various options like taking an individual window or full-screen shot which is helpful while gaming where capturing specific moments on your own terms may not always be possible!
How Do I Screenshot a Specific Area in Windows?
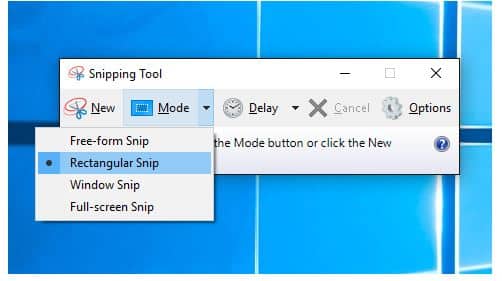
Snipping Tool is a great way to take screenshots on your computer. Here I’m going to show you how easy it can be done in just 3 simple steps!
- Open Snipping Tool
- Press Ctrl + PrtScn keys
- Once inside the program’s interface select Mode as shown in Figure 1 then choose what kind of snips will suit best for what situation on the top right area below that option; The arrow next-door New button offers more details about how it works with older versions also!
Where do screenshots go on PC?
To take a screenshot and save the image directly to your computer, press both Windows keys and Print Screen keys at once. You’ll see that screen dim briefly for an effect like when taking pictures with a physical film or digital camera in front of it! This will also create shortcuts on different computers as long as those have access rights: find C:\Users[User]\My Pictures\Screenshots if possible where all screenshots are stored by default.
How Do I Open The Snipping Tool In Windows 7?
The Snipping Tool is a popular third-party Windows app that allows you to take screenshots of what’s on your screen. You can launch it by going into Accessories and clicking “Snip & Go.” Then click anywhere in order for the captured image to be saved with an easy-open option, or choose where they will go once opened from within its settings menu (the default location should suffice).
How Do I Take a Screenshot of Part of a Screen in Windows?
You can also use the keyboard shortcut Windows key + shift-S (or new Screen snip button in Action Center) to capture a screenshot with Snip & Sketch. Your screen will dim and you’ll see Snip ‘n Sketch’s small menu at top right corner where it lets choose from various options like Crop, Share, or Save As Type before choosing whether it should be an image file as well – perfect for posting on social media!
What Is the Shortcut Key for Snipping Tool?
To use the Snipping Tool and Some keyboard shortcuts, we need to the Snipping Tool program, instead of clicking “New”, you can use Ctrl + Print Scrn (the keyboard shortcut) to quickly create an image without having to select from a list! The crosshairs will appear when this happens so all that’s left for you to do is release your mouse button or pen tip whenever desired then drag across what needs captures in order until released again – easy peasy right. maybe not quite as much fun but certainly easier than scrolling through pages upon pages looking at full screens.
So there we have it: two different methods which both yield great results with minimal effort put forth.

Hello, My name is Shari & I am a writer for the ‘Outlook AppIns’ blog. I’m a CSIT graduate & I’ve been working in the IT industry for 3 years.